Hello!
Check out my Facebook page for makeup bits!
http://www.facebook.com/ShabanaDarrMakeup
Shabs x
Tuesday, 9 October 2012
Saturday, 6 October 2012
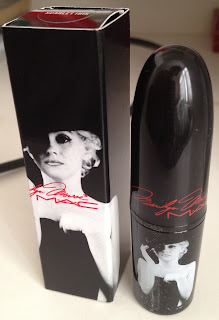
Mac Marilyn Monroe Collection Purchases.
Hi all!
It's been such a long time since I've been inspired to write I just haven't had that feeling about a product or technique that has inspired me to get on here and tell whoever is listening...until now. Yesterday I went to Mac to pick up some bits and do some back to Mac-ing. I've recently depotted some blushes and eyeshadows for my palettes and had aquired a fair few empties. I also wanted to take a second look at the current collection inspired by Marilyn Monroe as there where a few things I was really interested in. I purchased two items from the collection and I'm excited about both. The first thing is the brow finisher which is a clear brow wax in stick form used to hold brow hairs in place. You're now thinking how is that exciting? But for me I've been on the lookout for this sort of product for a while now and had not found anything similar, either I live in a bubble, or this kind of thing is hard to get your hands on. I'm big on brows just in case it hasn't come across before and I've wanted a clear brow wax for ages and although I haven't been on a hunt for one it has always been in the back of my mind. I have pretty thick eyebrows and this is the way I love them. I fill them in sometimes with powder and sometimes with a pencil depending on how I feel that day or how I want them to look. I have always wanted something that will keep them in place without making them look like they're gelled down. I don't like to use brow gel on my brows for this reason I like the hairs to look natural and because the hairs are darkif I use a gel they look abit too much like they've been slicked down which is why I wanted a wax. Instead of the gelled down look it tames the hairs without making them look wet or crunchy and is exactly what I've been after so I'm very excited and glad I've got it.
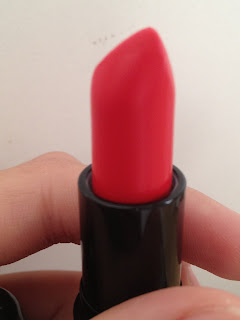
Now onto the more exciting stuff! The collection has 5 lipsticks. One nude and four red. If money was no object I would probably have picked up a couple. But of course my resistance to buying makeup is getting higher than it used to be as I have so much these days it's more difficult to justify. Although there was one colour I could not resist it's just so stunning! I'm not much of a red lip wearer and by this I mean I don't own or wear red, ever. I do have a few in my kit so have dabbled but never actually worn one out the house. But the times that I have tried them on I realised that for my skintone if I was to ever wear a red it would be a real blood orange red if I ever found the perfect one again something I had it in the back of my mind. Another sidenote I love orange I'm just obsessed with the colour in my makeup world.When I swatched the colour Scarlet Ibis from the collection I was head over heels and it is exactly the colour I had in mind, so of course had to buy it. It's a really beautiful orange red which is creamy and smooth in texture and the colour is vibrant but not fluorescent. Eventhough the formula is matte the colour does not look flat on the lips and it is not difficult to apply or move around the lips in comparison to another red colour I own from Mac called Rubywoo. I really love it and when I got it home and tried it on I was overly excited by it I think the colour is just so pretty and makes me actually want to wear it out the house. So this evening I hope to be doing just that I'm going out to an engagement party and will sporting my first red lip, the excitement wish me luck its going to take some courage but i'm so in love with the colour that I think it's time.


Happy to be back!
Shabs X
It's been such a long time since I've been inspired to write I just haven't had that feeling about a product or technique that has inspired me to get on here and tell whoever is listening...until now. Yesterday I went to Mac to pick up some bits and do some back to Mac-ing. I've recently depotted some blushes and eyeshadows for my palettes and had aquired a fair few empties. I also wanted to take a second look at the current collection inspired by Marilyn Monroe as there where a few things I was really interested in. I purchased two items from the collection and I'm excited about both. The first thing is the brow finisher which is a clear brow wax in stick form used to hold brow hairs in place. You're now thinking how is that exciting? But for me I've been on the lookout for this sort of product for a while now and had not found anything similar, either I live in a bubble, or this kind of thing is hard to get your hands on. I'm big on brows just in case it hasn't come across before and I've wanted a clear brow wax for ages and although I haven't been on a hunt for one it has always been in the back of my mind. I have pretty thick eyebrows and this is the way I love them. I fill them in sometimes with powder and sometimes with a pencil depending on how I feel that day or how I want them to look. I have always wanted something that will keep them in place without making them look like they're gelled down. I don't like to use brow gel on my brows for this reason I like the hairs to look natural and because the hairs are darkif I use a gel they look abit too much like they've been slicked down which is why I wanted a wax. Instead of the gelled down look it tames the hairs without making them look wet or crunchy and is exactly what I've been after so I'm very excited and glad I've got it.
Now onto the more exciting stuff! The collection has 5 lipsticks. One nude and four red. If money was no object I would probably have picked up a couple. But of course my resistance to buying makeup is getting higher than it used to be as I have so much these days it's more difficult to justify. Although there was one colour I could not resist it's just so stunning! I'm not much of a red lip wearer and by this I mean I don't own or wear red, ever. I do have a few in my kit so have dabbled but never actually worn one out the house. But the times that I have tried them on I realised that for my skintone if I was to ever wear a red it would be a real blood orange red if I ever found the perfect one again something I had it in the back of my mind. Another sidenote I love orange I'm just obsessed with the colour in my makeup world.When I swatched the colour Scarlet Ibis from the collection I was head over heels and it is exactly the colour I had in mind, so of course had to buy it. It's a really beautiful orange red which is creamy and smooth in texture and the colour is vibrant but not fluorescent. Eventhough the formula is matte the colour does not look flat on the lips and it is not difficult to apply or move around the lips in comparison to another red colour I own from Mac called Rubywoo. I really love it and when I got it home and tried it on I was overly excited by it I think the colour is just so pretty and makes me actually want to wear it out the house. So this evening I hope to be doing just that I'm going out to an engagement party and will sporting my first red lip, the excitement wish me luck its going to take some courage but i'm so in love with the colour that I think it's time.


Daylight

Stunning


With flash

Scarlet Ibis and Rubywoo
Anyone else in love with anything from the collection?Happy to be back!
Shabs X
Wednesday, 27 June 2012
Products I’m loving right now post!
Hi everyone!
Today’s post is all about products I’m using frequently and
loving at the mo that I wanted to mention and tell you a little about. First up
is the foundation I am appreciating the most.

For a while, I went off my Bobbi Brown Skin Foundation. I'm not
too sure why I had loved it when I first bought but then when my skin wasn’t in
very good condition (with quite a few dark marks from spots) it wasn’t covering
enough for me. Now that my skin is looking better and the marks have faded, I
really like the foundation once again. It is a light coverage with a natural skin-
like finish. The name could not describe it any better it really looks like
your skin just perfected. It is runny similar to the MAC Face and Body but a
less sticky product and very slightly thicker consistency. It’s quick to apply
and very easy to blend and I’m liking the finish I get applying it with my
fingers. I've just been applying it in the areas I need coverage and leaving
the rest of my skin as is. I Love that I can do this with this foundation because
the colour matches so well it doesn’t look odd and uneven on my skin if it has
not applied everywhere. This is one of the many reasons I love Bobbi Brown. Their
colour range is amazing and you can get an exact match not one that is close to
your skin colour. I wear the shade warm beige 3.5 and in the MAC Face and Body,
I use either C3 or C4. The only downside if there were one would be that it doesn’t
last all day. Personally, this doesn’t bother me as I love the finish of it and
this is what is most important to me. The packaging is almost perfect. It comes
with a pump (nice and hygienic) which I love and the bottle is glass which
feels more luxurious so fine for your collection but not great for a kit as it
could smash. To get the best finish when applying this foundation skin needs to
be well moisturised after cleansing. If you want it to last longer try using a
primer, but I love the look I get applying it on bare skin.


The next product I’ve been using non-stop is my Rimmel wake
me up concealer in shade 040 Soft Beige. I am in love with this concealer formula.
Its fairy new and they also have a foundation in the same range, which I do not
have, but I was curious when I tried it on my hand. This concealer is great for
the under eye area. It has a peachy undertone that is ideal for cancelling out
dark circles and brightening the area and it works amazingly. My eye area is dark
all around not just underneath so sometimes ill apply it on my eyelids too to
get a flawless looking base. The concealer is quite moisturising similar to
something like the Mac moisture cover but is a slightly thicker consistency so
covers better and doesn’t crease as easily. It’s also great for brightening
other areas of the face like around the mouth and nose as well as for me on any
dark marks left behind from spots. I apply it in a small triangle shape under
each eye, which makes you look a lot more awake, just as the name suggests. However,
it can be used anywhere on the face to brighten up that area. If you want it to
last as long as possible, set it with a translucent powder. I’m amazed at this
product as my expectations were not this high but it’s my favourite concealer
at the moment and its quick too as it’s a corrector and concealer in one
product. It comes with a doe foot applicator, which I use to place the product
where I want it and then pat and blend it in with my finger, which I find,
works best. It is stunning and so accessible I was surprised at how good the
colour match was considering it isn’t a high-end product but I am impressed
with it and highly recommend it.

Third product of the somewhat marathon post I’m creating is
the Mac lustre drops in pink rebel. This product is a liquid highlighter to be
used anywhere on the face or can be mixed in with foundation to get a super
glowy finish. The colour translates on the skin as a light golden slightly peachy
sheen. I use it on the tops of my cheekbone to highlight and it gives a nice
summery looking glow. It is a runny consistency and so very easy to blend into
the skin. You only need a small amount as if you apply too much on top of foundation
you can disturb the product you have on underneath. It is a warm tone so really
suits medium skin tones and I’m sure would look lovely on darker skin tones
too. It works really well in conjunction with the skin foundation and the
blushers i'll mention in the next post.


There will be a follow up post to this with the other three products,
as this one is getting rather long, as we all know I can go on forever.
Shabs X
Thursday, 14 June 2012
Are You Worth That Humongous Price Tag? Chantecaille Just Skin Tinted Moisturiser.
Hi everyone,
Today’s post centres on the Chantecaille Just Skin tinted moisturiser. I have seen it mentioned by some of my favourite beauty bloggers so one day I decided to try it while I was in Libertys in central London. Of course I did not want to like it due to the jaw dropping price tag it comes with (RRP £55 for 50 grams of product). The sales associate applied it with fingers and told me in the places you need more coverage you can pat it on for more product. He also said it was different to most other tinted moisturers on the market as it was a matte finish. This intrigued me because although I do like to wear a tinted moisturiser now and again I don’t like the way they make the skin feel somewhat greasy and sticky and you end up with a very shiny finish on the skin.
Today’s post centres on the Chantecaille Just Skin tinted moisturiser. I have seen it mentioned by some of my favourite beauty bloggers so one day I decided to try it while I was in Libertys in central London. Of course I did not want to like it due to the jaw dropping price tag it comes with (RRP £55 for 50 grams of product). The sales associate applied it with fingers and told me in the places you need more coverage you can pat it on for more product. He also said it was different to most other tinted moisturers on the market as it was a matte finish. This intrigued me because although I do like to wear a tinted moisturiser now and again I don’t like the way they make the skin feel somewhat greasy and sticky and you end up with a very shiny finish on the skin.
When he showed me a mirror I was impressed it made my skin
look healthy but very natural and offered more coverage then your average
tinted moisturiser. It definitely did not leave that overly shiny finish but on
the same not was not completely matte (there is no way I would like it if it
was, I'm a glowy skin girl!). It felt light on the skin as if I was not wearing
anything. Then off I went to have a long hard think about the purchase of such
a product with a price tag as hefty as this one. Eventually, although it took
me a while I caved and got my local Harvey Nichols to order it in for me, one
of those times where you cannot stop thinking about something you have seen. I
wear the colour ‘Glow’ which makes my skin a tiny bit warmer than it is
naturally. It has a spf15, which is nice, and when on makes my skin feel very
soft. The smell is light and fresh and once on is not noticeable. The packaging
is super simple but hygienic and easy but in no way luxurious.
It is a stunning product but you really need something extra
to warrant that price and in my honest opinion, although I like having it in my
collection I don’t think id say the price is justified. If it was between £30-£40
I’d let it slide but it is just a little too expensive for what it is. Yes its
unique, I have not come across a tinted moisturiser like this before but is it
a miracle product like you may expect after seeing the price? Afraid not.
My advice to you if you’re thinking of purchasing it don’t expect
it to sing and dance because the price is about double that of your other high
end tinted moisturisers. If you were prepared to pay more for a product, which
essentially doesn’t do more, then you’ll be content but if your looking for it
to prove itself by being the best thing you’ve ever tried I’d say choose something
else which leaves you with a little more spare cash.
In case you just cannot stop thinking about it, it is
available in the following stores:
Space.nk
Harvey Nichols
Harrods
Libertys
Hope this was somewhat useful peeps!
Shabs Xx
Friday, 11 May 2012
Sleek Matte Palettes Swatches And First Impressions!
Hi everyone!
So me controlling my urges and trying to restrain from buying these palettes lasted approximately 2 days. I was holding out to but a Yaby palette.....but then I went to Superdrug and stumbled into a mix and match 3 for 2 across the store (which is still going on, run!) and the self control went out the window! I clearly just needed any excuse. So here are some pics of the stunning palettes, which contain only matte colours (obvious I guess) and some swatches.


Taken with no flash
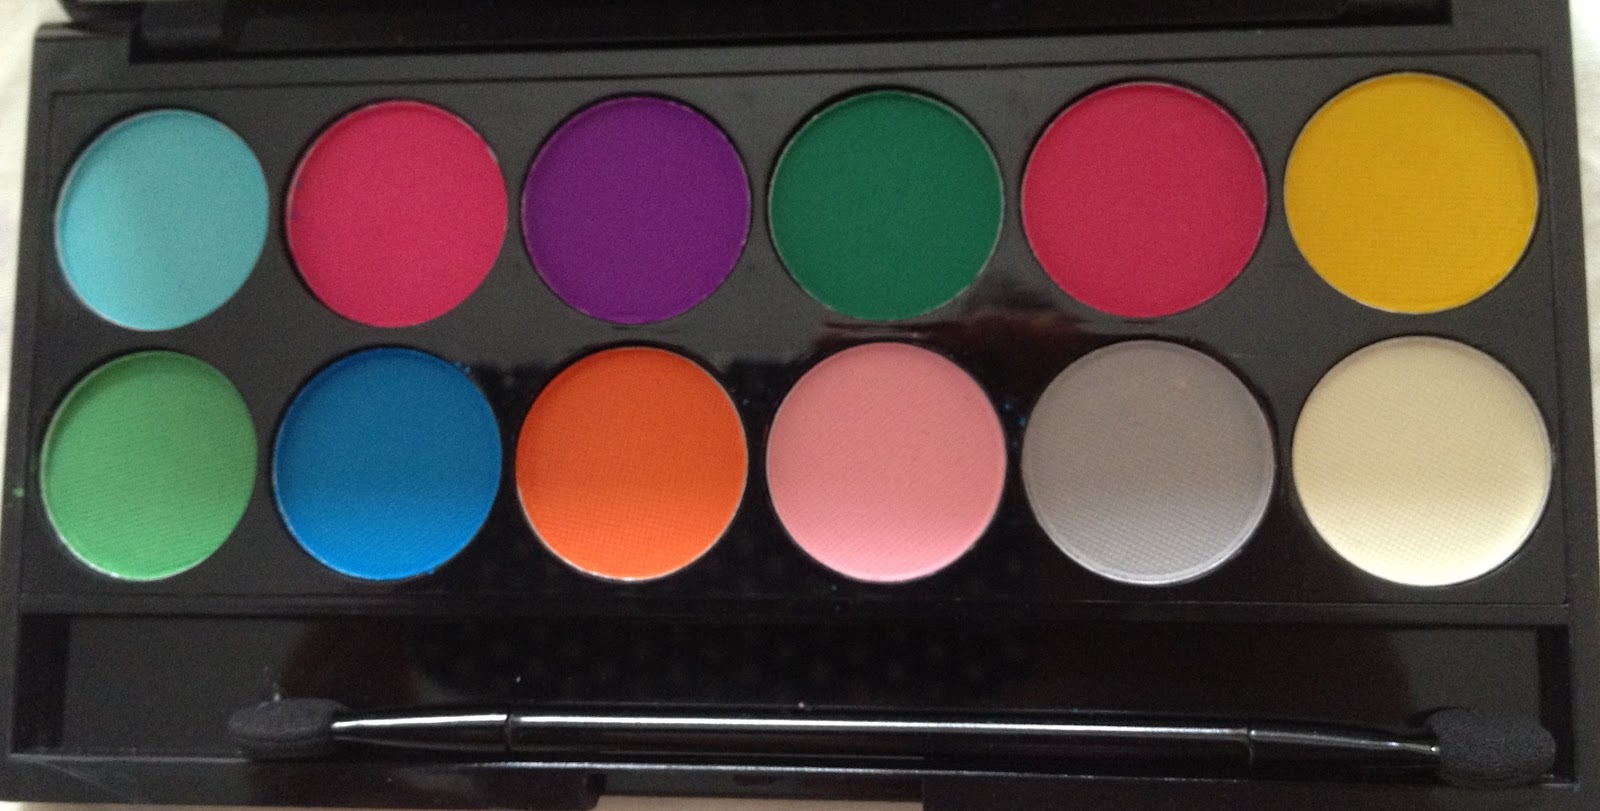
Brights palette

Taken with no flash

Taken with flash
All the shades are soft, smooth and pigmented , the only one I think could get messy is the dark green as this was powdery. The two colours which weren't as pigmented as the rest were the purple and yellow. But with a little work these shades can still work. Matte coloured eyeshadows are generally known for being hard to work with and not as pigmented as shimmery eyeshadow. Don't let this put you off though, this palette is stunning with a great selection of colours and matte eyeshadows have their own beauty the colours can look deeper and more intense.

No flash Darks palette

No flash
The colours in the Darks palette transfer easier and all the shades are pigmented, smooth and soft. The colours are more neutral in this palette. These are just initial thoughts from me I'm excited to use them as I haven't yet. They are available in Superdrug and on the Sleek website so if you're tempted I'd go for it, they're great value and stunning, and don't forget 3for2 in Superdrug so you could get another one of their great palettes for free, I got the Original palette. I may do an in-depth review later when I've had a chance to play with them but for now that's all from me.

Colourful arm
Shabs x
Friday, 4 May 2012
My review: You may call it the Real Techniques Buffing Brush I call it a magic wand!
Hi everyone,
So today, I am reviewing as promised the Real Techniques Buffing Brush. I had heard many good things about this brush on YouTube and eventually when the brushes became available at Boots I decided to go pick up the core collection set this brush comes in. My opinion on the brush was formed instantly from the first time I used it I could see why it was becoming so popular so quickly. The foundation I first used it with was the Chanel Vitalumiere Aqua. The application was effortless and so quick. All I had to do was move the brush around my face and my foundation was flawless, well blended and done in no time. I think the reason it takes next to know time is that the brush is so dense that as soon as you apply your foundation and move the brush it has blended the product for you already. It also really helps the foundation and your skin marry rather than having product sit on the skin. The look you get is reminiscent of airbrushed foundation in how it is very even and perfected.
I was impressed and I wanted to try it out with my other foundations to see if it was just as good. I used my Bobbi Brown Skin foundation one day to test the results and just as expected, it gave the same flawless look to the foundation. I have also used it in conjunction with my Chantacaille Just Skin tinted moisturiser and my Bare Minerals foundation. With the Just Skin, it gave a similar effect as the foundations although I do quite like applying this with my fingers too. With the Bare Minerals, it also worked surprisingly well but the look was similar to when I apply this with a Bare Minerals brush.
All the brushes from the line are made with synthetic bristles. They are super soft and feel feather like on the skin. I would say however that you really notice if the brush is not freshly washed when you use it. Brushes, which are made with real hair, soak up product which I find means you can use them a few different times without washing and they still work well. With the Real Techniques brushes, the bristles just seem to hold the product in between the bristles and so they need to be washed more often to get that sought after application. This is not at all a negative though it is a lot better for you skin to be in the habit of keeping brushes squeaky clean.
This brush is incomparable to any others I have and the effect it has on the foundations I have used it with is unique. It really is signature to the brush. I used to love applying my foundation with a stippling brush but this is a million percent better, so if like me you like to stipple on your foundation I’d go out and get yourself this little beauty because you will be addicted by the magical effect it has on any liquid foundations.
Thanks for reading!
Shabs


Best Friends


Thursday, 26 April 2012
Sleek Eau La La Liners: Swatched and Reviewed
Hi everyone!
Today i'm excited to upload swatches and pics of the new Eau La La liners by Sleek. These liners are similar in concept to the Mac chromographic pencils in that they are made to use anywhere that is desired and not limited to eyes or lips. When I first heard about these I couldn't wait to try them as I love anything that is multi-functional and versatile in makeup and they came in so many different shades. They seemed to good to be true.
So far I have purchased 8 of the 20 shades they come in and every single pencil is amazing and consistent in quality. They are soft and creamy, highly pigmented and transfer effortlessly onto the skin. I love all the shades and am so happy to see some of the more daring colours like the orange and the yellow pencil which you don't tend to see very often especially not on the high street.
When first applied they are can be smugded and moved around for about the first 20 seconds after this they go slightly sticky and then set so the staying power is really good. On the lips they are a little drying but would be great to make lipstick last longer and look more vibrant. On the eyes they are an amazing base for eyeshadow and last all day.
Sleek is a really great high street brand. I love how they are constantly bringing out great makeup artist products which everyone can get their hands on. These liners are great for personal use and will be amazing in my kit too. They retail at £3.99 each which is unbelievably reasonable as the quality of them is unflawed and yes I want the other 12 shades. They are available st Superdrug and on the Sleek website.
My only negative is that they are difficult to sharpen. They crumble a little and it is hard to get a real sharp point. This means you end up wasting product while you sharpen them which really saddens me because its really the packaging that isn't good enough for the fantastic product. A tip to sharpen them Iv'e found is to focus on sharpening the black part rather than the colour.
Enjoy them they are a rare find!
Shabs x
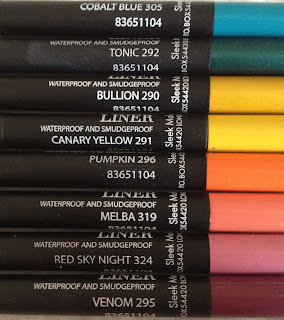


Tuesday, 17 April 2012
Best 10 second beauty tip ever!
Hi all!
Today's post is a simple one, and could consist of just one sentence; curl those eyelashes! I will however go into more depth. If I was limited to what I could do in the morning for make up curling my eyelashes would be at the top of the list. Curling the eyelashes opens up the eyes, makes your eyelashes appear longer and helps give your eyes more definition. It's one of those tips that works universally.
When curling the eyelashes place the curler as close to the lash line as possible and squeeze the curler gradually moving it up the eyelashes to ensure you get a curl rather than a crimp.
My favorite lash curler is the one by Shu Uemura. It lasts a really long time and is good quality so curls very well. I am very loyal to it and so would really recommend it. Another more recent addition I've been finding very useful is the half eyelash curlers by Mac. They are really good for getting to the inner and outer lashes to really lift those lashes that the full curlers may miss. I love using both together as the eyelashes end up looking really lifted which makes the eyes look awake.The Mac curlers aren't as good quality as the Shu Uemura ones but they work because they are small enough to get to the hard to reach eyelashes.
Before

After


Friday, 6 April 2012
Pastel nails = Nastels!
Just sharing what my nails look like at the mo! Very springy and Easter appropriate I think. Xx

If you're not a fan of glitter then this may be more appropriate:

Shabs Xx
Tuesday, 27 March 2012
Money Well Spent: MAC Chromagraphic pencil NW25/NC30
Hi everyone
Today I wanted to share my thoughts on the MAC Chromagraphic
pencil in NW25/NC30 with you all. The reason being I’m really loving it and
reaching for it frequently in my daily routine. The pencil is a skin-tone
colour which can be used anywhere on the face. It is quite a hard pencil, which
made me initially think it would drag and be difficult to work with, but the
colour transfers well, and it is easy to apply.
I love it for putting on the waterline to take away redness
and brighten the eyes; a skin tone colour is much more natural then using a
white on the waterline. I also like using it around the lips to outline if i'm
using lipstick as it makes the colour look a lot neater as well as taking away
any darkness or pigmentation around the mouth. Another way it works is as a
base on the lips before lipstick to give a truer colour and helps the lipstick
last longer. I have tried it as a base on the eyes too and it gives a nice even
colour to work onto as well as helping the eye shadow colour to go on more
pigmented.
I love products that
can be used in multiple ways as they are handy and you always feel that its
money well spent when you reach for something everyday. Another reason I like
the pencil is that because it is so small you can apply a small amount and be
precise, for example when outlining the mouth, or you can apply more when using
it as a base.
The pencil costs £13 but is only available at MAC Pro stores
or on the MAC Pro website. It also comes in a lighter colour for paler skin tones and a darker colour suitable for darker skin tones. If you are thinking about getting it id say go for
it, I have nothing negative to say!
X
Monday, 26 March 2012
One size doesn't fit all: Contouring
Hi everyone
Just to clarify before you all think that all I do is write about contouring, its definitely not I have a lot to say about many things but my last post sparked up some things I wanted to mention on the subject, i'll try and be snappy.
Contouring is a great tool and technique which when done well can really enhance features and parts of the face. However, it’s not universal in the way it should be used. Yes there are parts of the face whereby the use of contouring will flatter many different face shapes, for example, under the cheekbone, jaw line and temples but this does not mean you can follow the same steps for everyone. Instead of following a guide, to get the most out of your contouring, really look and respond to the face you are working on. Aim to bring out the parts on the face which will flatter that particular individual.
The so-called ideal face shape and, the one which is most desired is oval, so a good tip is to look at the face you are working on and decide which parts need to be skimmed to make that particular face look more oval in shape, which, in turn should give you a guide of where you need to contour. For contouring cheekbones try keeping the contour line off the cheek area as this will look more natural. One other tip, use a cream for a softer contour or if you want more definition try using a powder.
I feel like getting habitual with a technique such as this (moreso as an MUA not so much on yourself) means it ends up sloppy and imprecise, it’s all about getting the best out of what you have and is not a one size fits all!
Hope these are some helpful tips I’ll stop myself now as I could go on forever.
Shabs
X
Real Techniques Contour Brush Review: So much more than a contour brush!
Hi everyone,
I had the urge to do a review on this brush because I love it so so much and am stunned by how amazing it works. The brush comes in the ‘core collection’ in a set of four made by the well-known You Tuber Samantha Chapman from Pixiwoo. The reason I actually bought the set was for the increasingly popular buffing brush (which I will be reviewing separately) so it took me a bit of time to try this one when putting on my makeup as it was not the reason I bought the set.
Coming onto the topic of price, it is in my opinion a steal at £21.99 for the set of four, and if we were to divide it evenly that would mean it works out at around £5.50 per brush, which is crazy. It does not come alone as far as I’m aware so you would need to buy it with the others but that’s not really a negative for me. I’d recommend you all get yourselves one it will be glued to your hand if you’re anything like me.
Let me know your thoughts!
x


I had the urge to do a review on this brush because I love it so so much and am stunned by how amazing it works. The brush comes in the ‘core collection’ in a set of four made by the well-known You Tuber Samantha Chapman from Pixiwoo. The reason I actually bought the set was for the increasingly popular buffing brush (which I will be reviewing separately) so it took me a bit of time to try this one when putting on my makeup as it was not the reason I bought the set.
I don't contour on a regular basis, which is what this brush has been labelled to do (but of course, you can use any brush for any use). Whenever I have tried to contour I never really get a precise enough placement of colour and you may laugh, but I have quite a small face, so I really don’t like big or normal sized face brushes to contour. Aside from this, I am too lazy to do it on a regular basis as it adds another step to my routine.
After using the buffing brush a couple of times I looked to begin trying the other brushes in the set and picked up the contour brush. I thought I would give contouring a go that day, as I wanted to see how the brush worked. Just like the buffing brush, the contouring brush was extremely soft and nice to touch. I put quite a lot of product on the brush (I must have been going for a heavy contour) and used it just under my cheekbone and the colour went on so effortlessly and blended out within seconds almost as if I didn’t even do anything. The brush did all the work for me, something as an MUA I will always look for as it makes my job easier. I then realised I really didn’t want to put the brush down and added a cream highlight with it which worked just as well. Furthermore, I picked up my blusher and used a small amount of that with the brush too. I then ended up with a dirty brush.
This is an amazing brush as it is so precise due to its size and shape. It blends the colour as you apply it and even if I’m being heavy handed with picking up the product it never leaves me with a stripe of colour. It is extremely multi-use as it works with powder, cream, highlight, contour and blusher, (the reason I want another 10 of them!) and I have yet to keep using it as I’m sure the list goes on. Due to the hairs being synthetic the brush(es) are not limited to either cream or powder giving you an endless amount of freedom in the textures you can use it with, I haven’t had the brush for very long but as I said I don’t want to put it down.
Coming onto the topic of price, it is in my opinion a steal at £21.99 for the set of four, and if we were to divide it evenly that would mean it works out at around £5.50 per brush, which is crazy. It does not come alone as far as I’m aware so you would need to buy it with the others but that’s not really a negative for me. I’d recommend you all get yourselves one it will be glued to your hand if you’re anything like me.
Let me know your thoughts!
x
Available at Boots: http://www.boots.com/en/Real-Techniques-Core-Collection-1403_1252038/


Subscribe to:
Comments (Atom)